Showing posts with label Tutorial. Show all posts

Friday, 29 April 2016

My First Craftwork Cards Online Craft Class is Live Tonight!

Hi there everyone!

How are things with you? The weather here is so changeable! One minute it's sunny and the next it's blowing a gale and hailing!

Tonight is the first Online Craft Class with Clare on the Craftworks Card blog! This will start at 7pm and there will be posts every 30 minutes with the last post at 9pm. There will be step by step photographs along the way and we would love to see what you make!

Here's a sneaky peek of what you will be creating!


If you would like to know more about the class, click here and there's also details of what you will need so you can get everything gathered, and instructions on how to shut the world out and give you two hours of peace and quiet. Sorry, only joking, I'm not a miracle worker!

Hope to see you there!


Sunday, 12 June 2011

Waste Not Want Not!

Hi there,

And a Happy Sunday to you all. I've spent the day doing nothing much, and to be quite honest I like yet loathe days like this. I like the relaxed feeling 'nothing much' gives, although I loathe the feeling on non-achievement. I'm definitely a do-er and to do nothing seems alien.

So this afternoon I decided to so something I have been meaning to do for ages. I hate any waste, and get great satisfaction from completely using up the last of things.  I also got Joseph involved, but he got bored quickly as they do at this age and went off to play at being the 'Gas Man' - don't ask.

I'd got some Yankee Candles that hadn't burned away completely, so after removing the old metal plate for the wick and any debris, I broke them up and put them in a sealable bag. I added to the bag any time I had spare wax from the same fragrance candle.


I bought some paraffin votive wicks from candleiciouscandles on ebay, they were very reasonable so make it worthwhile buying some to use over time.


I was going to buy some votive moulds, but I could only find them in fours at the store I went to and they were so expensive for the amount of times I will use them. So I bought these votive holders from a candle suppliers for 99p each and these will do the job perfectly. The only downside is that once they're moulded in there, they stay there, unlike if I'd used a mould.


I used a makeshift Bain Marie from a Pyrex jug {other heatproof jugs are available!} and a saucepan full of water. to melt the leftover wax from my Yankee Candles, this fragrance being my favourite, Creme Brulee. I waited until all the wax had melted before pouring. You can speed up melting time by breaking up the wax into smaller pieces to increase surface area. You see, I did listen in Physics!


Then as soon as the wax was completely melted I poured into the holders. The wick might move around a little but once poured you do have a few seconds to make sure it is centralised. The jug can be easily cleaned by putting it back into the Bain Marie and wiping round with kitchen towel. Make sure you don't burn your hands! End of patronising warning!


Finally, here is one {creamy caramel} which is nearly solidified, and the other {creme brulee} has just been poured. Can you see how the one on the left has dipped a little in the middle? This is what happens when they set, so it's a good idea to leave a little wax to reheat and pour to get a flat, perfect candle. I don't know if they may have lost some of their fragrance, but they smell good to me!

Thanks for coming to visit! Don't forget there's another Freebie Digi Monday tomorrow!

Wednesday, 4 May 2011

Storing Clear and Unmounted Stamps...Answering a Question

Good Morning!
I had planned to do this post on Saturday, but you know how things are what with a Bank Holiday weekend!


I had a comment on my post here about the way I store my rubber and clear stamps in CD cases, as the person had heard that there is something in the CD plastic that can deteriorate the cling in both ezymount and the polymer. I had heard this also, so I decided to do a little research, both on the internet and of my own.

I made this video{which I would love your comments on, and you can also subscribe to the Clare Curd Crafts! Channel on You Tube, lots of videos to come! } so you can see the results of my own research, but I also mention that I have found some links with more information. You can find these here and here.

So, there you have it. I wanted to do this so that you were all fully informed as to all the information out there about whether storing stamps in CD cases is a safe idea. From what I've discovered I'm still happy to leave my stamps as they are, and I'd love to know your thoughts!

Saturday, 30 April 2011

Storing Clear and Unmounted Rubber Stamps Tutorial

Good Evening!

I would like to say thanks for the lovely comments I've had about my newly refurbed craft room. It has always been a joy to work in there, and I know I'm very lucky to have a room of my own. I've often joked that if I had a gas hob and a shower in there I would never need to leave my room!

I'm going to be showing you how I did the lettering and vinyl decal over the next week or so, but I had a question as to exactly how I store my clear stamps after I posted a piccy of my CD's which you can see here, so I thought I would do a kind of tutorial to show you exactly how I do this.

 Here's my folder where I keep all my images of my clear and unmounted rubber stamps. I try and keep this {as much as I can} in occasion categories such as Christmas, girly, masculine, flowers, sentiments etc. The folder allows me to add new sheets within a category whenever I get new stamps. It was my aim once I'd got this system up and running to stamp and categorise them as soon as they were bought, and get them into the CD's , but with the best laid plans this hasn't happened, and at the moment I must have about 100 packs of clear stamps to sort categorise and store! So this is how my system works.

 I take my set of stamps, and decide which category it will fit most. In this case I'm storing the 'Born to Shop Go Green' stamp set, so in this case it will go in my girly section. I'm using the lid of an A5 storage box as an acrylic block, placing all my stamps onto this to stamp onto a piece of white card. I used to stamp them with an acrylic block, but found placing, inking stamping and cleaning took so long, it's much quicker this way and just as effective, after all you only need to make out the image, it doesn't have to be perfect. I use a dye based black ink so it dries quickly too.

When I use a lid instead of an acrylic block, I make sure that I press down within the lid to get the best impression possible.
If some of the images don't come out fully, it doesn't bother me, after all it's only as a reference point to remember what stamps I have. Can you imagine trying to find a particular stamp with all your CD's on a rack together - it would be like trying to find a needle in a haystack!


I use CD cases to store all my stamps. I get my cases from a local printers for about 20p each, but you can also get them from Tesco {and other leading Supermarkets, I'm sure!} in packs of 10, I usually pay about £3.50 here. Please note: You need to get the normal size CD cases, not the jewel, slim CD cases as these are not thick enough to store even Clear stamps and therefore will not close. Remove the inner section where you normally would store the CD by prizing at the spine edge carefully. This can be discarded {unless you can find another use for it of course!}.

Once my stamping is complete, I 'stick' the clear stamps {or unmounted rubber on ezymount} onto the inside of the cases. This is why I have the stamped record of the image in an easy to find way. Both sides of the CD case can be covered with clear stamps, meaning that depending on the size of the set, you can group some together. Rubber stamps on ezymount can only cover one side because of their thickness.

The stamped sheet is then given a number, and I also make labels with my Brother label printer to stick on the spine of the CD case. The CD's will be in numerical order on the shelf, but not necessarily in the folder as they will be put in their particular category.

 If the CD case only contains a particular stamp set then I will also write the name on the spine too.

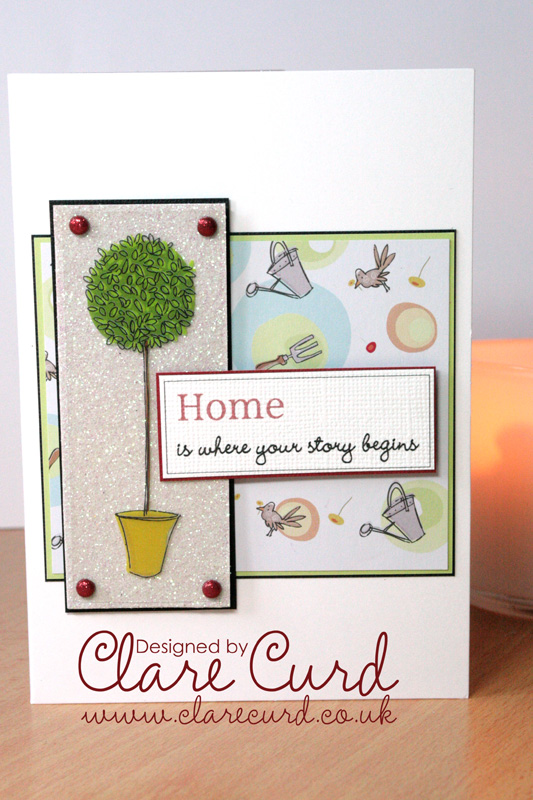
Now, I hear you ask, what do I do with the lovely images printed onto acetate that illustrates the stamp set? Well, sometimes I cut to size so it will fit into the CD case, but usually I make a card from it!

I made this card using the acetate image of the topiary tree from the packaging, and fixed it to white glitter cardstock using red glitter brads. In fact all of this card is made with scraps! I LOVE making cards from scraps and recycled items! I made the sentiment panel on my laptop, as can you believe I must have about 500 sets of clear stamps, and I've counted 547 woodmounted stamps, and I HAVEN'T GOT a new home stamp?!! The mind boggles!

Supplies: Image: Topiary Tree from packaging of 'Born to Shop Go Green' Papers & Cardstock: Born to Shop Go Green A5 Paper Pack; Papermania Glitter Cardstock; Core'dinations black & white cardstock; Greeting: Made with fonts Accord light SF and LD Charming Bold.

Well, I really hope you found that truly helpful! I enjoyed doing it, and at least it was another stamp set confined to a CD case!

Thursday, 3 March 2011

Fairy Godmother Spell Book Tutorial

Good Evening,

Let's not talk about the length of time I've been AWOL shall we? I suppose I have to just face it, life gets in the way every now and again (well, most of the time actually). I've said it before and I'll say it again - I don't know how people keep up with it. I'm going to try though (and I've said that before, haven't I?).

Tonight I thought I would show you how I made the Fairy Godmother Spell Book for the Panto that we (The South Bank PLayers) put on in January. I LOVED making it, and I thought it would make a great addition to a children's themed party. It was so easy to make. I don't think I'll ever get rid of it!Here's Sue (the Evil Queen) and Me (Fairy Liquid!) just before the last performance!


This is photo heavy but pictures say a thousand words!

Firstly, I chose a book - I wanted a reasonably big one, but one that wasn't too heavy as we had to hold and act at the same time - talk about multi tasking! My book about Titanic was perfect.

 So I removed the dust cover, and replaced with an A3 size of Green paper - which JUST fit!

I then applied distress inks in Walnut Stain and Pine Needles with a dry baby wipe around the edges to give an old, well used look.

After this I applied Precious Metals (docrafts) and gold pigment ink with a new but still dry baby wipe to the edges of the book, don't forget the spine!

This is just before I embellished the book with the letters...

And this is after! The corner embellishments are Papermania Bare Basic Chipboard shapes which I have painted with Precious Metals in Gold, and the the letters are Papermania Gold glitter chipboard letters. The white lettering is BasicGrey, and I also added a Papermania Gemstone Stickers Crown, and Mosaic Gems.

Hope you like it - I don't know what I'm going to do with it now, but I know it will grow old with me! That's all for tonight!

Thanks for stopping by!

Thursday, 10 December 2009

Post it Note Holder Tutorial

Can you believe it...I know....don't keel over on me. Two posts in 24 hours. That must be some kind of record for me!


Well, tonight I thought I would show you how those little post it note holders from yesterdays post came into being. Of course, if you know how, please turn away now. I'll shout you when were finished!


Firstly, before the lowly post it note was turned into a princess by the fairy godmother (ie me!) it was but a piece of cardstock measuring approximately 17 x 8.5cm. As you can see on the photo, I have also made a score line, about the thickness of the post it note pad. Now, of course you will need to adjust the measurements of your base card to reflect the size of the post it note pad, but I think they are all pretty standard, just check afore ye cut. The cardstock I have used here is white core'dinations cardstock, but on other post it note holders I have made, I have changed the colour to complement the papers and even the post it notes!

Now I have turned over onto the textured side of the card and cut two squares of patterned paper (this paper is We R Memory Keepers Tiffany Collection). Isn't this paper just gorgeous? Well I call it paper, but really it's double sided paper - almost cardstock, complete with glittered areas! I have cut these squares leaving a small border of white card around the edge.

Then I have turned the card over again (are you dizzy yet!) and attached ribbon to the centre of the edge of the card on each side. I used about 18 cm of ribbon each side, making sure there was about 14cm hanging over the edge. I use the markings on my craft mat to make sure the ribbons match up on each side. As you can see I have nicked David's electrical tape to fix the ribbon as it's strong and won't be seen by the time I've finished! I've had this tape for about 6 months and David still hasn't noticed - what does that tell you about David and his D.I.Y habits!

Now I made two squares of white core'dinations cardstock to fit the two panels exactly, and stuck them over the inside of the folder. Simples!

Finally, I stuck the post it note pad to the left hand side of the card, which not becomes the bottom. For heavy things, or when I want to be sure that something will stay stuck, I use a hot glue gun. Then I went ahead and decorated the outside of the holder!


I did all the holders as a batch, that is I cut all the card together, cut all the panels together, and stuck all the ribbon together. You can still use different patterned papers and colours, I usually spend sometime choosing my papers before hand and getting everything together before I start. You can guarantee though I'll change my mind!

Well that's it....You can look back now!!

Will I be back tomorrow? What might I have...who knows! Come back and visit again x

Love, Clare x

Monday, 28 September 2009

Happy Birthday From All of Us!

Well, haven't I been a naughty blogger? What with one thing and another I've not been posting as often as I should. As usual, life has just got in the way! I'm going to make a concerted effort to be a good blogger from now on, so please forgive me.

I thought I would start my return to blogging with a little explanation of how I made this card which features in Clare's Corner of the September issue of Docrafts Creativity! Magazine. As you can see I took pictures at the time of making this to show you how I created it, so I suppose the thought was there!

First of all, I created the main centre panel of the card using my fantastic Quickutz (TM) Silhouette SD Machine. I used a number of images, available through the Quickutz Silhouette Website. I just LOVE my Silhouette machine, there are loads of new die cut images available every week on every conceivable subject, and I just love looking through them all as they are so inspiring!

Now for the purple panel on the left hand side of the card. As you can see it's a negative of the pink patterned part of the card. Firstly, I created an extra row of the pattern on the silhouette SD and placed it onto a panel of purple core'dinations (TM) cardstock that I previously distressed using a sanding block. Then I used the waste portions from the pattern and stuck them down using repositional adhesive and moved the row of pattern down until the whole panel was filled with the waste 'diamonds'


I then applied clear pigment ink using a Clearsnap (TM) Watermark ink pad, and then clear embossing powder.


It was then time to remove the waste 'diamonds'. You can remove the diamonds before you apply the powder, but sometimes there is a little residue adhesive left, and the powder can easily stick to it. I find that once the powder is heat set, the adhesive is easily removed. Whatever works for you! (the brown sheet is just a Teflon baking sheet which I use to protect my cutting mat from the heat from my Heat Tool.)


The powder was then heated until the powder melted. I make sure that as soon as the powder starts to melt, I move to the next area to avoid burning the powder.


This final picture is just to show you the finished look that is achieved. I love the way that even though the card has been sanded, a glossy, and almost darker look is achieved where the embossing powder is applied.

And there you have it....that wasn't as painful as I thought - my return to blogging that is. I hope you found that helpful and check in again soon to see what I've been up to. I'm going to try for at least every day from now on!

Thanks for coming by!

Love, Clare x