Saturday, 28 December 2013

Some of my Recent Crafty Makes...

Hi there!

Clare here with some of my cards that I've meant to post for ages and haven't got around to! I'm going to make this post a quick one as I'm getting the website ready for the 

MASSIVE 40% OFF SALE!

Starts 10am on 1st January, so don't miss out to get some great bargains. Postage and Packaging will be free on orders over £25.00.


Here is the christmas card I made for my Mum and Dad. I absolutely adored making this card. It took ages but it was worth it! 

Products Used from Clare Curd Crafts:


This is just a fun card I fancied making. Usually the best type of cards! 

Products Used from Clare Curd Crafts:


A nice, easy quick card. The papers do all the work for you. 

Products Used from Clare Curd Crafts:

BasicGrey Carte Postale 6 x 6 paper pack 


And this is just a random card that I made for my friend's wedding anniversary. I cut the typography out with my cameo, and added the heart embellishment stickers to finish. Lovely. xx

Hope you like. Watch out for the sale starting if you want to grab a bargain!

love, Clare x


Saturday, 31 August 2013

Happy Birthday Green and Pink Stylee!

Hi there!

Clare here with a card for you.

I was asked to make this card for Peter's Mum for her Birthday. I don't know why but I always stress when making a card for someone else. Will they like what I've done, will the colours be right...especially when your brief is "Well I don't know what she likes, just make anything!"Well, thanks, that's really helpful!

In the end after much deliberation and three hours from a card blank here it is...


I am really happy with it and thoroughly enjoyed the whole process! However it does weight a lot with all those layers! I love a weighty card, it shows time and quality, although I don't like the price tag at the post office!

I used Best Creations A Walk in the Garden 6 x 6 paper pad, and these have to be seen to appreciate the beauty of this bundle of loveliness! Each of the 24 papers have iridescent glitter encapsulated within a gloss finish, accentuating areas for increased gorgeousness. 


The dashed squared paper in the background is from the new DCWV 6 x 12 stacks- this one is the ledger paper stack. 


I love ledger paper, and these stacks are fantastic as they are shaped at the bottom which you can wither include in your design or trim off for use as a border or something! There are 36 sheets of double sided paper.  Here I've inked the edges with tea dye distress ink pad. 

I cut the circles using my trusty Martha Stewart Circle cutter, I can't remember exactly what size sorry, but the grey mat was 2/16th of a inch larger than the white circle. The flowers were made using the Brand New Clare Curd Crafts die cut - pom pom flowers. These come as a flat spiral, which you coil together and glue to the circle in the centre using silicone or hot glue (I love hot glue because it's so instant!), so you still get the joy of creating something beautiful but with ease! In the pack you get three medium and one small flowers (there's one of each pictured here). I added a pearl to the centre of each flower.

The tickets are also new to Clare Curd Crafts! Called...can you guess....Clare Curd Crafts Die Cuts - Ticket, and are invaluable for adding a greeting on an extra embellishment to a card. They measure 1 x 2.26 inches and there are 15 per pack cut from white core'dinations cardstock.

I stamped the ticket with a greeting from the Big Sentiments Stamp set from Paula Pascual. I LOVE all of her stamp sets as they are so well thought out, made by a crafter, for crafters.


I stamped with back ink and heat embossed with clear powder.  A few clear gems and seam binding (I must get some of this for the shop!) finishes the card.

Hope you like it!

love and crafty hugs, Clare x


Wednesday, 21 August 2013

BasicGrey Hey Girl and Bo Bunny Family is Cards...

Howdy Everyone!

I truly hope you have enjoyed visiting our little party today. I know I've enjoyed seeing all the wonderful projects that the Clare Curd Crafts Design Team have come up with! A true inspiration! 

Firstly, before I get onto my projects, I would like to say a HUGE thank you to all the design team members for putting all the hard graft in, for coming up with the projects, for taking the photographs and for writing the instructions. And a VERY SPECIAL THANK YOU goes to Melanie Marshall, our design team leader, for answering questions, staying up till stoopid o'clock to sort out stuff, helping the design team, keeping me informed and keeping me in line! I couldn't have done it without you Mel. xx

So, here are my projects. I have 9 to share with you. I know....I don't post a card for like 18 months, then 9 come along at once! My post won't be as super detailed as the other DT members, but I hope the pictures will speak louder than words. 

If you would like to win these 9 cards, all you need to do is leave a comment at the bottom of this post. The winner will be randomly chosen from these comments on Tuesday 27th August. Good luck!


Firstly, onto The cards made with mainly the BasicGrey Hey Girl Collection, a great new range which is so fun to use...

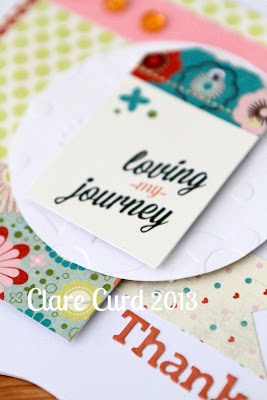
I had such fun putting this one together! This card features some interesting matting and layering, and even though this was the first card I made, it would be great for using up your scraps of patterned papers. This card features BasicGrey Hey Girl Paper 6 x 6 paper pad. Oh no! I've just spotted that the 'Thanks' is skewif! Arrgghh! Anyhoo, I used the BasicGrey Sticker pack alphabets for this. You get 6 sheets of alphabets in 6 colours and they're great value!


I love these cute element stickers from BasicGrey 'Hey Girl' Collection. They're a veritable bargain at just £1.34 (with your 10% off) for a whole sheet of yumminess! Check them out here!

Supplies: BasicGrey Hey Girl 6 x 6 Patterned PaperHey Girl Element StickersBasicGrey Capture Sticker Pack - AlphasCraftwork cards Elegant square card pack; Circle cut from an old sheet of embossed paper, but you could die cut a circle then emboss. 


Here's a fun card using the BG Hey Girl Chipboard Embellishments. You get oodles of these in the pack and they're self adhesive so you can stick down easily or use with 3D foam pads for more dimension. Again I've used the BG Hey Girl papers but I've introduced the BG Hey Girl Micro alphabet stickers (which come in an awesome font) along with BG Hey You Canvas Adhesive Alphabet stickers. These are real canvas letters in a neutral colour for both card making and scrapbooking. 


I've also added a flower from the Clare Curd Crafts Perfect paper Flowers Collection, and some black checked ribbon. 


Please excuse me for saying but I LOVE this card. I just love the colours and the little touches. I've used a Darice Honeycomb embossing folder on kraft cardstock for the background, then I added vintage photo distress ink to the edges. In fact I added distress ink to most of the paper edges. BG also do a great  6.5 x 9.5 paper pack in the Capture Collection which has all different kinds of ledger paper, old book papers, I LOVE it and I used it as the base for my greeting. 


 I've also used some of the Chipboard embellishments again (they're SO useful) along with a couple of buttons, ribbon and epoxy hearts. 


I really do LOVE this paper pack. Again this card uses the BG Hey Girl 6 x 6 paper pack, and this time I've covered the card base with one of the amazing patterned papers. Then I took another patterned paper, added one of the Clare Curd Crafts delectable doilies to the top left corner, then used a ticket corner punch on the....yes, you guessed it, punched the corners and added vintage photo distress ink to the edges. 


A little ribbonchipboard embellishment (oo they get everywhere!) Paper rose and a few drew drops finish the card perfectly. 


I made this card really with the idea in mind to show you a few of the different patterned papers in the BG Hey Girl paper pack. I inked the edges of each square with Distress ink in Vintage photo before sticking down to the base card. I then simply added ribbon in two widths, and topped this off with a BG Hey Girl chipboard embellishment an a Cherry blossom flower in ivory.


I finished the card with an acetate butterfly from the BG Hey Girl die cut and transparency pack which is literally FULL of fun!


Have you guessed? Yes, another card made with BG Hey Girl papers...I just couldn't stop myself! This is very simple but I think that's where the beauty comes from. I also used the BG Hey Girl Element StickersChipboard Embellishment, and the BG Hey Girl Garlands which are amazing! These are double sided and have fine thread stitched through each one so that they hang like a genuine garland. I also used the BG Capture ledger paper pack again with a circle punch. 


Supplies: BasicGrey Hey Girl 6 x 6 Patterned Paper; BG Hey Girl Chipboard Embellishments; BG Hey Girl GarlandsBG Hey girl element Stickers BG Capture 6.5 x 9.5 paper pack, Red self adhesive gems. 


And now for something completely different! You'll be pleased to know that I've moved on now from BG Hey Girl (but I'll never give her up!) On this collection of cards I've used a new Brand to Clare Curd Crafts...Bo Bunny! In particular I've used the Bo Bunny Family is 6 x 6 paper pack I just love this collection and it scream "Use me and abuse me!" as soon as I unpacked it from the the box! Again another great layout for using up scraps. As you can see I also added some of those gorg Heidi Grace Epoxy hearts again. 


I used one of the Hero Arts Frame Cuts Die sets  to create the scalloped oval panel. These dies are used to die cut Hero Arts stamp designs, but of course you can use them on their own, which makes them very versatile. The stamp is from the Hero Arts Many Birthday Messages Stamp set which is absolutely fantastic and I can see me using this one again and again.

Supplies: Bo Bunny Family is 6 x 6 paper pad; core'dinations cardstock in grey; Hero Arts in the Frame die Scalloped Frame,Hero Arts Clear Stamps Many Birthday Messages; Green and red pigment ink; Heidi Grace Printed Epoxy Hearts;


If you like a card with pattern, then this one's for you! Here I've used a Darice embossing folder to create the background on kraft cardstock, then I used a white inkssentials pen to add definition to the raised edges.


 I used the Hero Arts Many Birthday Messages stamp set again (LOVE this!) onto a panel cut with Spellbinders Nestabilities Labels 25. I drew around this with a black fine line pen whilst the die was still in place. When I stuck it down onto the card I raised the middle section more than the outer edges with 3D foam pads. I finished the design with Bo Bunny 'Family is' Chipboard stickers. ribbon and a few well placed gems. 


And last but not least is this pretty little number, which nearly ended up on the cutting room...or should I say craft room floor! Again, great for scraps! You'll be pleased to know that this doesn't need so much explaining!


Again I used Hero Arts Many Birthday Messages (snap these up as I don't think they will last long!), and a little seam binding I had left over from another project. I've also added a heart from the Bo Bunny Family is Chipboard stickers.And that's it!


Anyhoo, on to the giveaway. If you would like to win these 9 cards, all you need to do is leave a comment at the bottom of this post. The winner will be randomly chosen from these comments on Tuesday 27th August. Good luck


Thursday, 15 August 2013

Come and join the Clare Curd Crafts Relaunch party! x


Well Hello you little blog readers of amazing taste....


I am relaunching www.clarecurdcrafts.co.uk. Why I hear you ask? Well, just because I am jolly kind hearted and LOVE to give my crafty friends (and I really do see us all as friends) a good deal and a FANTASTIC shopping experience!

STOP PRESS: A.Mazing offer: 10% off ALL goodies from the CCC site, PLUS FREE postage AND a FREE gift!!!! Can the text get any bigger!

And To celebrate the relaunch of Clare Curd Crafts, we will be running an amazing blog party on Monday 19th August, unveiling projects and inspiration from our brand new Design Team, prizes and special offers.

The prize above, is our brand new Blue Smash Folio Bundle with a RRP £23.99!

containing:
1 folio with photo sleeves
1 smash stick pen and glue
1 elastic pen band
70 sticky notes
1 list pad (top 10)
1 wallet folio
2 paper clips
8 sticker strips
1 roll of washi tape
1 resealable decorative bag ( and who wouldn't like a resealable decorative bag? OK I must say this really just looks like a zip lock bad with a rather trendy smash booky pattern on it. Handy for holding your bits and that sort of shenanigans)

If you wish to get your hands on this incredible prize, please share the following image via Facebook/ Blogger/Twitter/Pinterest/instagram/google+ and anywhere else you can think of...I'm greedy!  (you will gain an entry per share) and leave a comment to let us know you have shared :) - Easy!


Please 'like' our Facebook page to keep up to date with shop news, including further prizes!
https://www.facebook.com/clarecurdcrafts


I hope to see you all at the party :)....Let's Samba! x

Winner of this prize to be announced at the blog party, Monday 19th August 2013.


Friday, 12 July 2013

A new thing for me!

Hi there everyone!

Know it's so long since I posted but I'm hopefully going to put that to rights from now on!

Just wanted to share some news with you. I am going to be one of the guest presenters for craft over on the Bid.TV channel. I'm so exited! My first show is on Tuesday 16 July at 12pm midday and then also Thursday 18th July at 12pm, followed by Tuesday 22nd at 12pm.

We have some great things on the show at amazing prices with just £1.99 postage and some items with free postage, so you just have to have a look!

Hope you can tune in...Freeview 23, Sky 654, Virgin 745 and Freesat 802!


Monday, 25 March 2013

I've treated myself!

Hey there everyone!

As you may know my divorce has now come through and with it the money from my half of the house.  As the amount is not enough to get a house, and I'm not in a position to obtain a mortgage as I'm self employed and therefore at this early stage cannot prove my income {which believe me is very frustrating}  - and to be honest with you I wouldn't want to take on a mortgage as I'm not really taking a wage yet, I am having to stay in my rented accommodation. I have taken a little of my money and treated myself to a new macbook pro, complete with retina display! It's lovely but I think I'm going to have a few hours of playing with it as some of the buttons are in completely different places to a pc! If I press the = instead of the delete button one more time...!

Anyway, that's all for now...I just wanted to practice typing really! x


Sunday, 13 January 2013

News about the Giveaway


Good Evening Folks,

Well as promised, I thought I would let you know what you could be winning in the next few weeks!

PLEASE NOTE, THE GIVEAWAY IS NOT LIVE AS YET, THIS IS JUST FOR YOUR INFORMATION.

So.....

How would you like to win this....


Yes, that's right...I'm going to be giving away one wonderful Silhouette SD machine, complete with all leads, software and a $25 silhouette online store card to add to the 50 shapes already included in with the machine.

More details will be posted on the grand launch date of 1st February. One of the requests is that you follow this blog and the Clare Curd Crafts Boutique Facebook page. Why not do that now, then that's two out of the way already!

Good luck and see you soon! 

Clare x


Wednesday, 9 January 2013

I can Explain...

Can you believe it's nearly been a year since I posted on here? I sometimes look at my blog, then if I had a mirror at the precise moment in time I would look back at myself in disgust, ashamed I've left it so long. Truly though A LOT has happened within that year. I don't really know why but I have felt for  some time that I should tell you about it, and there hasn't been a right time...until now.

well, I'm not the first, and I know I'm definitely not going to be the last (sadly). My husband David and I separated in May. It was my decision, and believe me, not one that I took lightly. To save people's feelings (as I know that David, and my family may read my blog) I will not go into the whole ins and outs, but things were just not right and either I could sit back and let it consume me, or I could grab the bull by the horns and do something about it. and that's what I did. I know that some will think that when you get married you're in it for the long haul, and I respect those people's opinion, but that wasn't for me.

And it's not like I decided on the toss of a coin or on the spur of the moment. I knew it was a massive decision which made it even more difficult. Not only would it affect mine and David's life, but also that of my family and most importantly, Joseph.

If i thought telling David was hard, telling Joseph was the hardest thing I've ever had to do in my life. How do you make a 7 year old understand that you are not and would never leave them, and that they would still want for nothing, yet expect them to believe that everything would stay the same? I'm crying now when I remember that awful day. I try not to think about it normally as it's too upsetting. As with anything time eases things and Joseph is now as happy as he ever was, but that day I knew he was breaking his heart.

And now 7 months on things are just getting a little easier. Just because it was me who made the decision doesn't mean that I wasn't wholly upset by the experience. I live in a village about 5 miles from my previous home, in a lovely 3 bedroomed apartment, with a fantastic craft room and amazing neighbours whom I've had the pleasure of getting to know though all of this. I have lost friends unfortunately,but gained some too, and I think that things like this shows who really were friends in the first place. If this has cemented one thought in my mind, never jusdge another until you've walked in their shoes.  And through all of this my best friend Sheila has stood by me like a rock. No one could ask for a better friend.

So now you know; that's the reason for my hiatus and the delay in setting up my online craft boutique.But I'm getting there, David and I are still friends and I'm thankful for that. He was my friend first and foremost and hope he always will be. And I hope Joseph knows I love him forever and with all my heart.